New in Basecamp: Get Notified When Someone Adds a To-do

Basecamp 3’s to-do lists keep you in the loop when you’re working closely with other members of your team. You get notified when someone assigns you a to-do and that person gets notified when you check it off.

This works great when it’s clear who needs to be assigned, but that’s not always the case. Sometimes you don’t know who should do the work, other times a to-do isn’t for anyone in particular and just needs to be logged.

Take a bug list, for example. People across your company might log software bugs, carefully documenting what’s broken and how to recreate it. In the moment, they might not be sure who to assign, so they log the bug and move on. But if you didn’t want those bugs to fall through the cracks, you’d have to monitor the list yourself.

It shouldn’t be on you to reload a to-do list every hour to see what’s changed. Starting today, you won’t have to!

A new notification

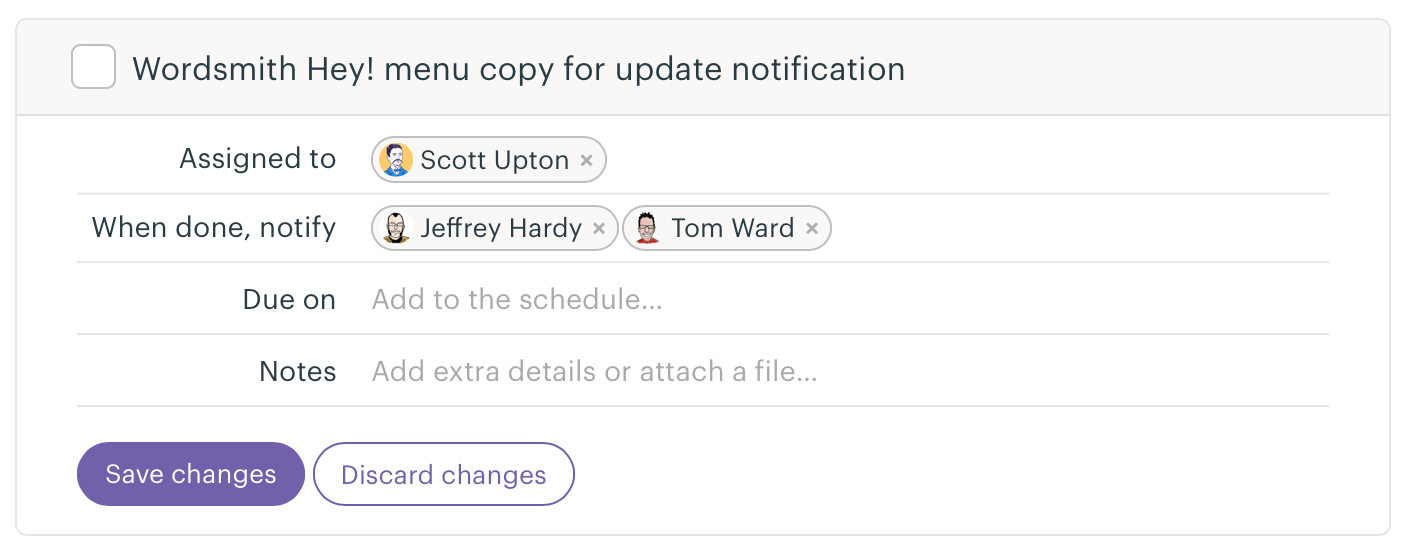
If you’d like to receive notifications when to-dos are added to a specific list, just go to that list in Basecamp. Inside the right-hand menu, you’ll see a new option to receive these notifications:

Turn on to-do notifications

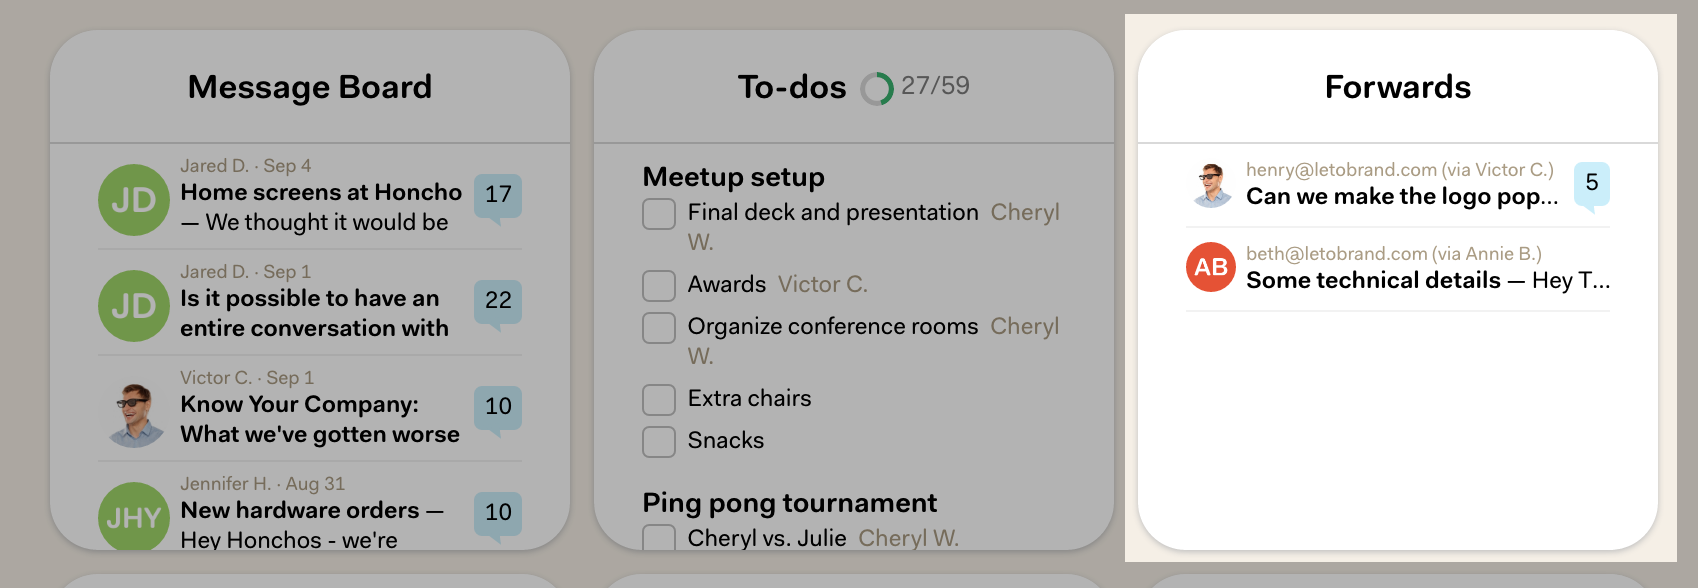
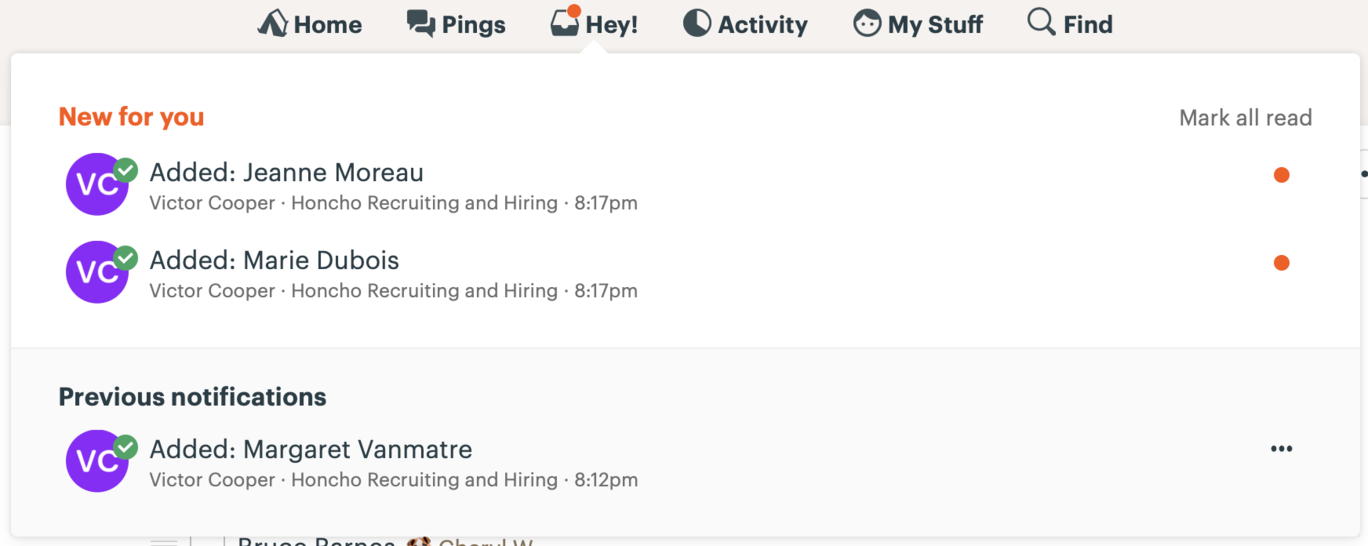
Once you’ve turned on notifications, you’ll see messages in your Hey! menu every time someone adds a new to-do to that list:

Hey! menu notifications

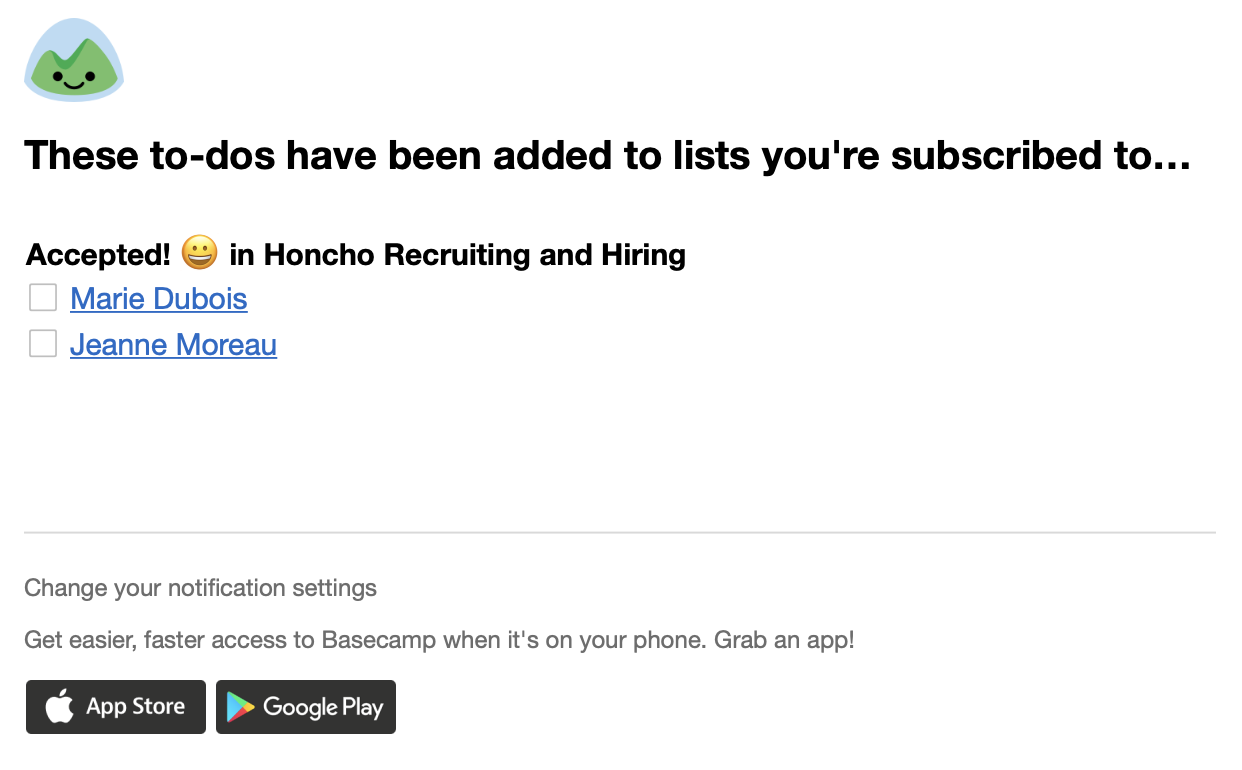
Prefer to get email notifications? No problem — we’ll bundle up these notifications so your inbox doesn’t get clobbered every time someone adds a to-do:

Email notifications are bundled

Just for you

These notifications are only for you and only for a particular list. Other people will have to opt-in if they’d like to receive notifications, too. Want to stop receiving notifications? Just visit the to-do list, open the menu, and turn off the notification.

Give it a try!

We hope this update makes it easier to keep track of bugs, QA issues, and other unassigned tasks. Let us know what you think!

Thanks again for being a Basecamp customer.

New in Basecamp: The “My Stuff” Menu

A great thing about the Home screen in Basecamp 3 is that your drafts, bookmarks, and assignments are all easily accessible. Load up Home, click a link, and see all of your assignments or your drafts in one place.

There’s just one problem with this approach: You have to leave whatever you’re doing to get to these links. We wanted to make it easier to find and access these “My…” links, and now you can!

Always available

Inspired by our mobile apps, we’ve removed these links from Home and added a dedicated menu called “My Stuff.” Now, no matter where you are, you can access your important links:

Open the menu and you’ll see your links up top plus a small collection of pages you’ve recently visited inside Basecamp:

Keyboard navigation

While we were building this new menu, we found it so useful that we wanted to use it without taking our hands off the keyboard. Just like the Find menu, we’ve added a keyboard shortcut to open My Stuff:

My Stuff: ⌘/Ctrl + ;
Find: ⌘/Ctrl + /

Once open, you can use your up & down arrows to navigate the links. Choose the link you want and hit Enter to visit that page — no mouse required!

Give it a try!

We hope this update makes it easier to access things like your unpublished drafts, assignments, and Boosts. Let us know what you think!

Thanks again for being a Basecamp customer.

New in Basecamp: Sort the Message Board

Basecamp 3’s Message Board is a central place for your team to post updates and gather feedback on the record. It’s great for announcements, internal pitches, and just bouncing ideas back and forth.

Since Basecamp 3 first launched, the Message Board has been sorted so new posts appear at the top with older ones below. That’s great most of the time, but many of you have asked for other ways to sort your posts.

New ways to sort

With this update, we’ve added a new sort order setting to Basecamp 3’s Message Boards. You can access this setting on your computer, tablet, or phone from the menu in the upper right corner of the Message Board:


Now, you can sort your posts three ways:

  1. By original post date: Messages posted recently will always be shown first. This is still the default setting.
  2. By latest comment: Messages with new comments be shown first. This keeps the most active discussions right up at the top.
  3. Alphabetically A-Z: Messages will be sorted based on their title. If you use the Message Board like a table of contents for your team or company, this option will come in handy.

Applies to everyone on the project

Whatever you choose, this will affect everyone on the project. That way, everyone will know where to put things and where to find things—you’ll all see posts in the same order.

Different projects, different settings

Each project has its own setting. If you prefer organizing your Company HQ alphabetically, your client projects by latest comment, and your marketing team by original post date that’ll work great!

What’s more, Message Board posts on your project’s home screen will remember your sort order, too:

The Message Board card, sorted alphabetically

That’s it!

We hope this update gives you more flexibility and makes the Basecamp Message Board even more useful. Let us know what you think!


Curious how we build features like this while working sane, 40-hour weeks? Be sure to check out our new book: It Doesn’t Have To Be Crazy At Work.

New in Basecamp 3: Get notified when someone reschedules events & to-dos

Stay in the loop when dates change

Last month, we added to-dos to the redesigned Schedule Card in Basecamp 3. This made it much easier to see what’s coming up on your projects.

But dates slip — due dates are shifted, events get moved—and Basecamp didn’t make it easy to see changes to your schedule. Starting today, whenever a to-do you’re assigned or an event you’re participating in is rescheduled, we’ll tell you about it.

Here’s how it works

Before, you’d only receive a notification when you were added to an event in Basecamp 3. Now, you’ll see a separate notification if that event gets rescheduled to a different date or time:

An event as added and then rescheduled

To-dos work a similar way. You’ll see notifications whenever due dates are added or shifted on your assignments:

Due date added and Due date changed notifications

Who will receive these notifications?

At Basecamp, we’re not huge fans of interruptions. To keep the noise down, we’ll only send these notifications to:

  • People assigned to the to-do
  • The person who made the assignment
  • Event participants

Other subscribers will not be notified of date changes. That means you can comment on an event or to-do without being inundated with notifications.

What if I reschedule something multiple times?

In another effort to avoid notification overload, we’ve grouped things together:

  • Hey! Menu: Hey! notifications are bundled for each item, so you won’t see 3 separate entries if your manager rescheduled that to-do or event 3 times in rapid succession.
  • Emails: For folks who prefer email, we’ll aggregate to-do due date changes into a single message. So if a manager sets due dates for several tasks, you’ll receive just one email about it:

A single email for recent to-do due date changes

We hope this makes it easier to keep track of upcoming events and due dates in Basecamp 3. We’re working hard on more improvements in the coming weeks. Stay tuned!


Got feedback or ideas to share? We’d love to hear what you think about the new features. You can contact us on Twitter or share your thoughts via our Support form.

New in Basecamp: Improved Schedule Cards

A more complete picture of what’s coming up

This was a classic case of “How hard could it be?” that started as a series of customer requests and bug reports. People wanted to see their events AND their dated to-dos on their Basecamp 3 Schedule cards. Totally reasonable, right? Like anything involving dates, timezones, and computers, it took more than a little wrangling… But now you can!

Let There Be To-dos
Here’s a great example from our Ops Team. Before, we only showed upcoming schedule events. That triggered a misleading message that said “Nothing’s coming up!”

Nothing’s coming up! Maybe?

Why is this misleading? If you click through to the Schedule itself, you’ll see there’s actually a to-do due tomorrow:

Surpise!

You wouldn’t have known that glancing at the Schedule card. With the changes we just added, you’ll now see something like this when you’ve got upcoming to-dos:

Voila! Just like the full Schedule

Who and When?
Another thing was missing from the previous design: It wasn’t clear exactly who was involved in an event and precisely when it was happening. That’s because we just showed the name of the event and the date on which it occurred:

What time is dinner, anyway?

Now, we show avatars for each participant and to-do assignee as well as times for events that happen at a specific time:

A lovely group and an early start.

Templates
Project Templates were also missing to-dos. That led to situations like this where the Schedule looked blank:

Nohting to see here… Or is there?

In fact, there may have been several to-dos:

The full picture

We hope this makes Schedule cards more useful for you. Stay tuned for more updates to Basecamp 3!


Got feedback or ideas to share? We’d love to hear what you think about the new features. You can contact us on Twitter or share your thoughts via our Support form.

New in Basecamp 3: Decide who gets notified when completing a to-do

Elevating an invisible feature

To-dos in Basecamp are pretty straightforward. At a glance, you can see who’s responsible, when it’s due, and important details you might need to know:


Unfortunately, it’s never been clear who will get notified when you complete a to-do. That made it hard to pass the baton to a coworker or tap your manager on the shoulder when you’ve wrapped things up.

Sure, you could hack things together by @mentioning someone in the Notes field or by subscribing them to comments. But if you just want to be sure someone knows when you’re done, you shouldn’t have to jump through hacky hoops to do it.

Say goodbye to hacks

Now, when you make a to-do in Basecamp, you’ll see a new field labeled When done, notify. Add people you want to notify when the to-do is completed and Basecamp will be sure to tell them about it:


Wondering who will get notified about a task you didn’t create? It’s all spelled out at the top of every to-do:


Basecamp will still send notifications to the original assigner and to everyone who’s left a comment about the to-do. But if you’ve ever wanted to hand work off to a colleague or keep someone else in the loop about a task, now you can be absolutely sure they’ll get the memo.

That’s it for now. We’ve got more great ideas in the hopper, so stay tuned. In the meantime, happy to-do’ing!


Got feedback or ideas to share? We’d love to hear what you think about the new features. You can contact us on Twitter or share your thoughts via our Support form.

New in Basecamp 3: Project Templates

Do the same sorts of projects over and over? Save yourself time by adding frequently-used messages, events, to-dos, and documents to a project template.

Project templates have been one of the top feature requests since launching Basecamp 3 last year. Lots of you run similar projects on a recurring basis or just want to avoid the copy/paste dance everytime you start a new project. Starting today, you can create a template and Basecamp will copy everything over so you don’t have to. Huzzah!

Here’s how project templates work in Basecamp 3:

Creating a project template

If your team copies the same to-dos or documents into new projects, it might be time to create a project template. To get started, click the link under Projects on your Home screen that says “Make a reusable template.”

Create your first project template

As on regular projects in Basecamp 3, you’ll want to name your project template and give it a description. This makes it easy to remember which template you’d like to use when you new create projects.

Name your template and give it an optional description

Now you’re ready to start building your template! This works just like other projects in Basecamp 3: Click the section you’d like to edit and add content. And like regular projects, you can organize the tools however you prefer. You can even rename the tools or turn some of them off. That’s useful if you want new projects to start with just To-dos and a Message Board.

Templates look and behave a lot like regular Basecamp projects

There is one major difference between templates and projects: Dates are relative to when you start your project. You’ll be able to pinpoint the week and weekday for your event (i.e. “Week 2, Monday”) and Basecamp will map everything to the Schedule automatically. Need to make changes? No problem—you can tweak your events and due dates before or after inviting people to the project.

Dates in project templates are relative to your project’s start date

Creating projects from a template

Once you create your first template, the “New Project” button will get a new option to start a new project using a template. Click that button and you’ll be prompted to choose your template before entering other details about your new project. Here’s how that works:

Creating a new project from a template

At the start, you’ll be the only person invited to your project. This is a good time to review project dates, tweak to-dos, and make any other changes.


When everything looks good, invite the rest of your team to the project. Everyone will get a summary email with all their assignments, messages, and other project details.

Managing your templates

To see all your templates and make edits, just click the “Manage Templates” link in the Projects section of your Home page. You’ll find your templates and an option to create more.

Click any template card to view that template and make edits. Need to archive, delete, or rename it? Click the ••• icon in the upper right and you can make those tweaks.


We hope this saves you time whenever you start your next project. For more details about how templates work, be sure to visit our help guide. Thanks for using Basecamp 3!

Happy templating!


Running your business on email, chat, and meetings? No wonder you’re frazzled — that’s the hard way! You do not have to put yourself and you team through the anxiety ringer all day, all week, all month, all year, and all career. There’s a better way.

Do yourself and your whole team a solid and switch over to Basecamp 3. It’s the saner, more organized way to run your business. We promise.

New in Basecamp 3: Email Forwards

The entire conversation, together in Basecamp

Basecamp 3 is great for keeping your entire team on the same page. All your to-dos, important events, documents, and conversations in one place, wherever you are. But what if the conversation starts outside of Basecamp?

Email is hard to avoid. Small businesses of all kinds depend on email to get things done. You discuss plans for the new office with your contractor over email. You review job applications submitted via email. You receive marketing emails from competitors you want to share with your team.

You could paste these important emails into a message or text document, but keeping up with replies can be a real hassle.

With the new Forwards tool, you can save any email to Basecamp 3, collect comments from your team, and reply directly to the original sender. Now, the whole conversation — comments and replies — lives in one place.

Getting Started

To start using Forwards in Basecamp 3, turn it on via the “Pick your tools…” screen. You can even rename it to something like “Job Applicants” or “Survey Responses” to suit your needs — whatever works!

We call it “Forwards” but you can call it anything you like

Once you’ve turned it on, Forwards will appear beside the Message Board, To-dos, and all the other tools in your Basecamp:


Forwarding Emails

Now that you’ve enabled the tool, you can send emails two different ways:

  1. Forward any email to [email protected] and we’ll send you a response email asking where to save it.
  2. Forward email to your personalized dropbox address and we’ll automatically save emails to Basecamp 3 without being asked where to file it. This is especially handy if you want another service to forward emails into your Basecamp directly.


After you forward it to Basecamp, your email will show up in the Forwards inbox along with all the other emails you’ve saved:

Forwards is a great place to store emails from job applicants, your lawyers, and more.

Click through to view the email, add a comment, or reply directly to the sender. Either way, your team is always in the loop!


Comments are for your team’s eyes only. The original sender will never see what you write. Replies are emailed to the original sender and shared with your team.

You decide how to respond

Basecamp 3 will collect replies from the original sender and thread them in alongside comments from you and your team. It’s all there — the original email, every email reply, and any comments along the way.

Comments and email replies, together at last.

Thanks for using Basecamp 3! We hope this makes it easier for you to keep your entire email conversation — not just comments from your team — in once place.


Running your business on email, chat, and meetings? No wonder you’re frazzled — that’s the hard way! You do not have to put yourself and you team through the anxiety ringer all day, all week, all month, all year, and all career. There’s a better way.

Do yourself and your whole team a solid and switch over to Basecamp 3. It’s the saner, more organized way to run your business. We promise.

New in Basecamp 3: Keep your clients on the same page. Just like you.

The Basecamp 3 Clientside keeps you and your client on the same page. It’s an on-the-record view of everything you’ve shared with your client and their responses, separate from the nitty gritty work you do with your team.

Before today, though, if your client wanted to see every conversation they’ve had with your team, they had to piece it together from their inbox. It’d be a whole lot easier if your client could see the Clientside, just like you. Now they can.

Welcome to the Clientside

Starting today, every email you send to your clients will have a link to the Clientside at the bottom:


When someone clicks that link, we’ll ask them for a 4-digit PIN. You can share this PIN with them or they can have it emailed to them. Only people on the project can request the PIN.


Everything, on the record

Once they’ve entered their PIN, your client can see the whole picture. Every Clientside conversation, every approval request — it’s all there. No inbox spelunking needed.


Sharing the Clientside

Prefer to send a link to the Clientside yourself? We’ve got you covered. At the top of every Clientside, you’ll now see the PIN:


Just click through to grab the web address, copy the PIN to your clipboard, or reset the PIN (should it ever fall into the wrong hands):


Thanks for using Basecamp 3! We hope this makes it easier for you and your clients to stay on track and collaborate more transparently.

Be sure to check out the Clientside help page for more details.


Basecamp 3 works where you do on iOS, Android, Mac, Windows, and anywhere you’ve got a web browser and an internet connection. Your first Basecamp is completely free so try it today, it takes just a minute to sign-up.